
Fitting uPVC Windows in Kerala: The Complete Installation Guide
A good uPVC window can still fail within a year if it isn’t fitted properly. That’s the part most people overlook when fitting uPVC windows — fitting quality, not product quality, is what actually determines long-term performance. At 5Elements, our teams have spent years fitting uPVC windows across homes in Kerala, and we’ve seen the same window brand perform beautifully in one house and poorly in another, purely based on installation.
Readers and search engines alike prefer content that explains the process precisely and accurately, so this guide covers all aspects that is needed to follow the steps – and if you want an even more granular, detailed step-by-step guide, resources are available for that too – as well as technical tests tools, on-site work, sliding windows, costs as well as mistakes and DIY or professional installation.
Step-by-Step Process for Fitting uPVC Windows
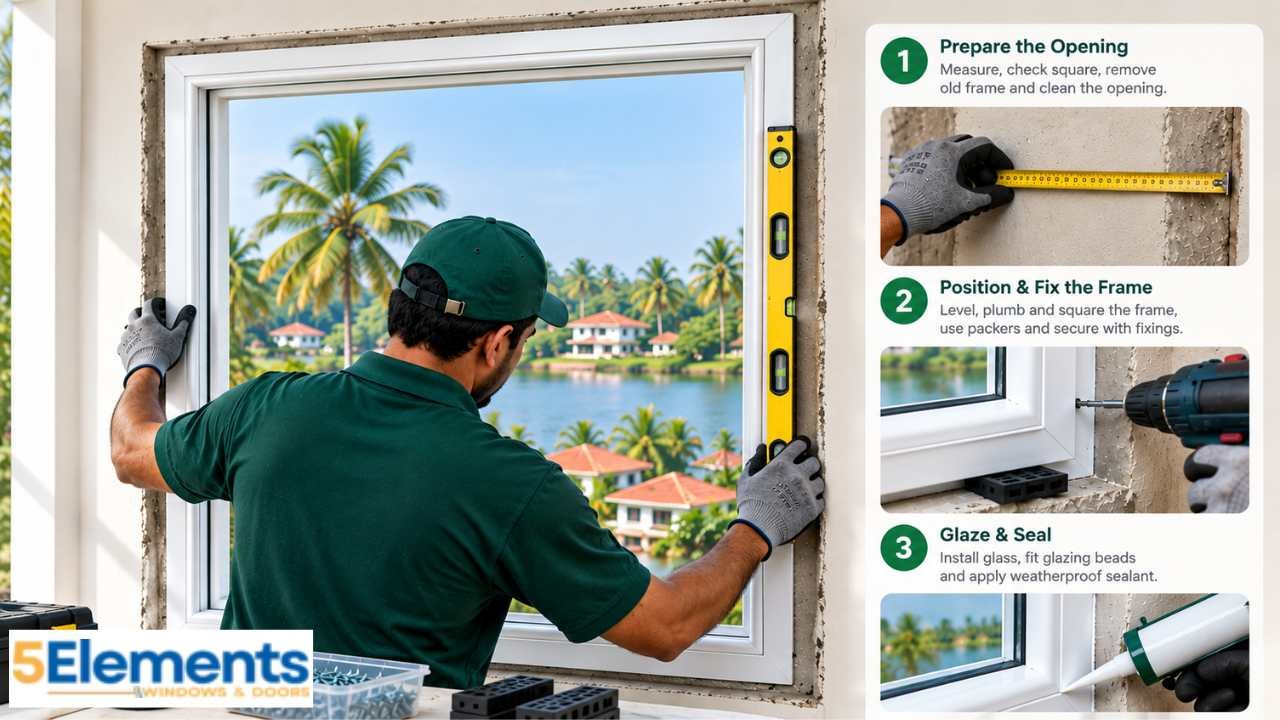
Every reliable job of fitting uPVC windows comes down to three core stages: preparing the opening, positioning and fixing the frame, and glazing and sealing. Do not rush or skip any of these steps, and problems will be apparent later, often months later, after the monsoon has arrived and the cracks you didn’t notice begin to let water in. Knowing these stages can be helpful even in the absence of performing the work yourself as it helps you determine whether the person fitting uPVC windows for your house is doing an excellent job or slicing corners.
Preparing the Opening
The installer starts by measuring the opening carefully and confirming it’s square using a diagonal check — measuring corner to corner in both directions and comparing the two figures. All old frame materials or debris and any remaining sealant residues are cleared out completely. The wall is inspected for damp patches, cracks or uneven brickwork because building on top of damaged walls is among the fastest methods to sabotage an excellent job of fitting uPVC windows.
Positioning and Fixing the Frame
The new frame is leveled using plastic packers placed at the correct points along the sill and jambs. Before anything is fixed permanently, the installer rechecks plumb (vertical alignment), level (horizontal alignment), and square — three essential checks in uPVC window fitting. Only once all three are confirmed does the frame get secured with fixings spaced according to the manufacturer’s guidelines, with alignment checked again after each fixing point to make sure nothing has shifted.
Glazing and Sealing
The glass unit is lowered into the rebate and centered so it sits square within the frame. Glazing beads are clipped into place starting with the shorter sides first, which helps keep the glass centered as the longer beads go in. Finally, a continuous, even bead of silicone sealant is run around the external perimeter of the frame, with no gaps or thin patches — this seal is what actually keeps Kerala’s monsoon rain out.
Why Plumb, Level, and Square Checks Matter in uPVC Window Installation
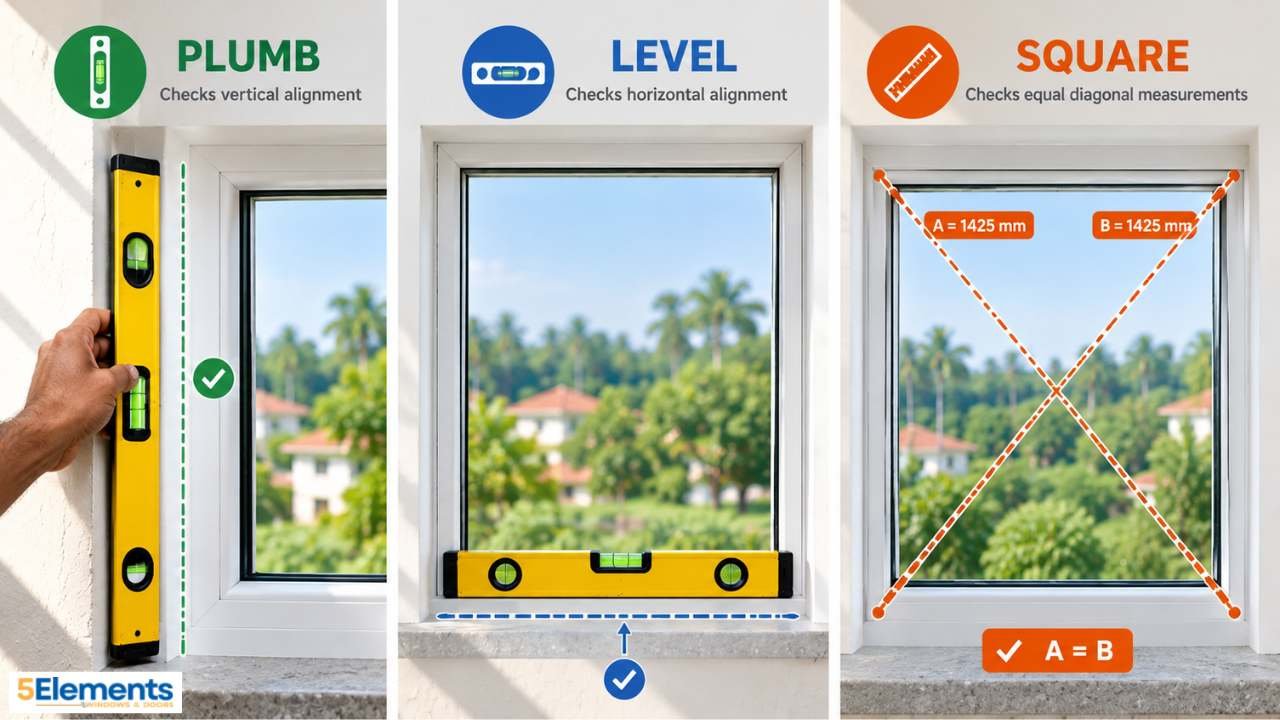
These three checks sound technical, but they’re simple in practice and critical to the outcome when fitting uPVC windows. Plumb means the frame is perfectly vertical, checked with a spirit level held against the side jambs. Level means the sill is perfectly horizontal, again checked with a spirit level, this time along the bottom of the frame. Square means the frame’s corners are true right angles, confirmed by measuring both diagonals — if the opening is square, the two diagonal measurements will match almost exactly.
Skipping any of these checks during uPVC window installation causes problems that don’t always show up on day one. A frame that’s slightly out of plumb makes the sash bind against the frame, so it feels stiff or scrapes when opening — and that constant friction leads to premature wear on hinges and rollers. An unlevel sill leaves uneven gaps that let in draughts and water. A frame that’s out of square causes the shutter to bang against one side and drag on the other, and sliding windows in particular become resistant to smooth movement when this happens.
As a rule of thumb, most experienced installers aim to keep the difference between diagonal measurements under about 2.5mm — beyond that, the frame is considered out of square and needs adjusting before fixing. This is also why packer position matters so much when fitting uPVC windows: packers placed incorrectly before the frame is fastened can hold it slightly twisted, and once the fixings go in, that twist is locked in for good.
Tools and Materials Needed for uPVC Window Installation
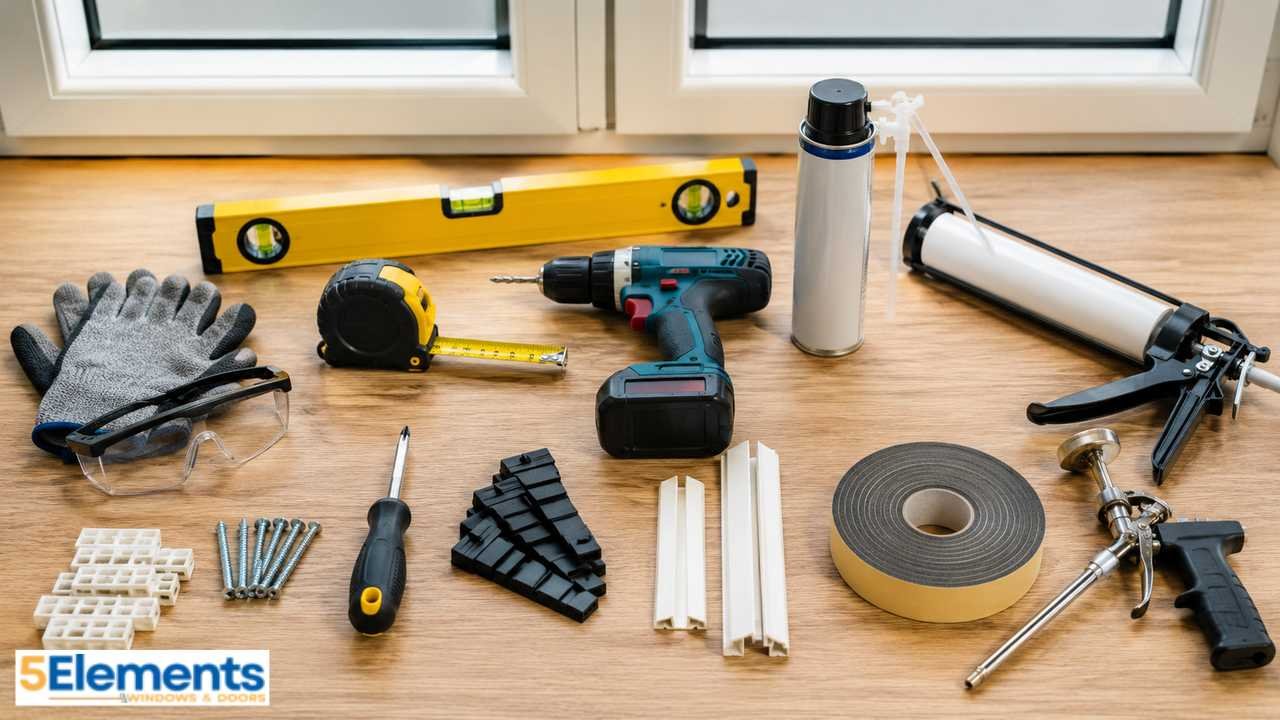
Having the right equipment on hand before the job starts makes a noticeable difference to the final result. Here’s what a proper uPVC windows fitting job typically requires:
Essential Tools:
- Spirit level (for plumb and level checks)
- Tape measure and diagonal measuring tape
- Power drill and screwdriver set
- Plastic packers of varying thickness
- Correct-length fixing screws
- Silicone sealant gun
Materials:
- Silicone sealant (weatherproof grade)
- Glazing beads matching the frame profile
- Expanding foam for the fixing gap
- Dust sheets to protect flooring and furniture
- Safety gloves and goggles
Missing even one of these mid-job is more common than you’d think, and it usually forces the crew to rush a step or improvise with the wrong tool — both of which lead directly to the fitting mistakes covered later in this guide.
What Does uPVC Work Involve On-Site?
Homeowners are often amazed by the extent to which uPVC work is done on site instead of in the workshop. A single window usually takes about one to two hours to install from beginning to finish, however this could be extended in the event that the opening requires repair work or when the window is particularly large.
On-site uPVC work also comes with some practical realities worth planning for. There will be dust from removing the old frame and any wall preparation, along with noise from drilling. It’s worth covering flooring and furniture with dust sheets prior to when the crew arrives, as well as clearing the way so that they can easily access the window both from within and out of the space.
Safety is a different aspect in on-site uPVC work that’s easy to ignore. When installing windows on the upper floors installers require access equipment, rather than using furniture or ladders that are unstable. In the event that you’re bringing in a contractor it’s a good idea to inquire about the access arrangements they intend to make use of prior to the start of the project.
Sliding Window Installation for uPVC Windows: What's Different
Sliding window installation follows the same core principles as other uPVC styles, but with one extra layer of precision: the track. Before the sash is even fitted, the track itself needs to be perfectly level along its full length, since any dip or rise will affect how smoothly the sash glides.
Once the track is confirmed level, the sash is fitted and tested by sliding it open and closed several times before anything else is added. Mesh panels or security grills, if included, are only fitted after the sash movement has been confirmed smooth — fitting them earlier can mask alignment problems that only become obvious once everything is assembled.
The most common issue homeowners report after poor fitting uPVC windows in a sliding format is friction — the window feels heavy or catches partway through its travel. This almost always traces back to an uneven track, debris left in the track channel, or rollers that weren’t adjusted correctly during installation.
uPVC Window Installation Cost in Kerala: What to Expect
The uPVC window installation cost in Kerala varies based on a handful of factors. Window size is the biggest one — larger openings need more frame material, glass, and hardware. The style is also important: The simple casement window will cost less than sliding windows, or a larger combination unit. Casement windows themselves come in a few configurations — single-frame, French (double), and push-out — with the simplest single-frame version usually the most budget-friendly. The type of glazing (single, double glazing or tinted) is an additional cost and how well the opening is a factor too, as damaged walls must be repaired before a new frame can be installed.
Some homeowners consider DIY installation to save on labor costs. This can work for a simple, ground-floor casement window if you’re comfortable with tools and have someone to help hold the frame steady. But for larger windows, upper floors, sliding styles, or openings needing repair, the risk of getting fitting uPVC windows details like plumb, level, or square wrong — and the water damage that follows — usually outweighs the labor savings.
Since so many variables affect the cost, we’d recommend having a custom quote on your site instead of relying on the general numbers you can find on the internet. A estimate based on a real visit to the site will give you precise window size as well as the condition of your wall and the glazing you’ve chosen, which cannot be matched by a generic number.
Common Mistakes to Avoid When Fitting uPVC Windows
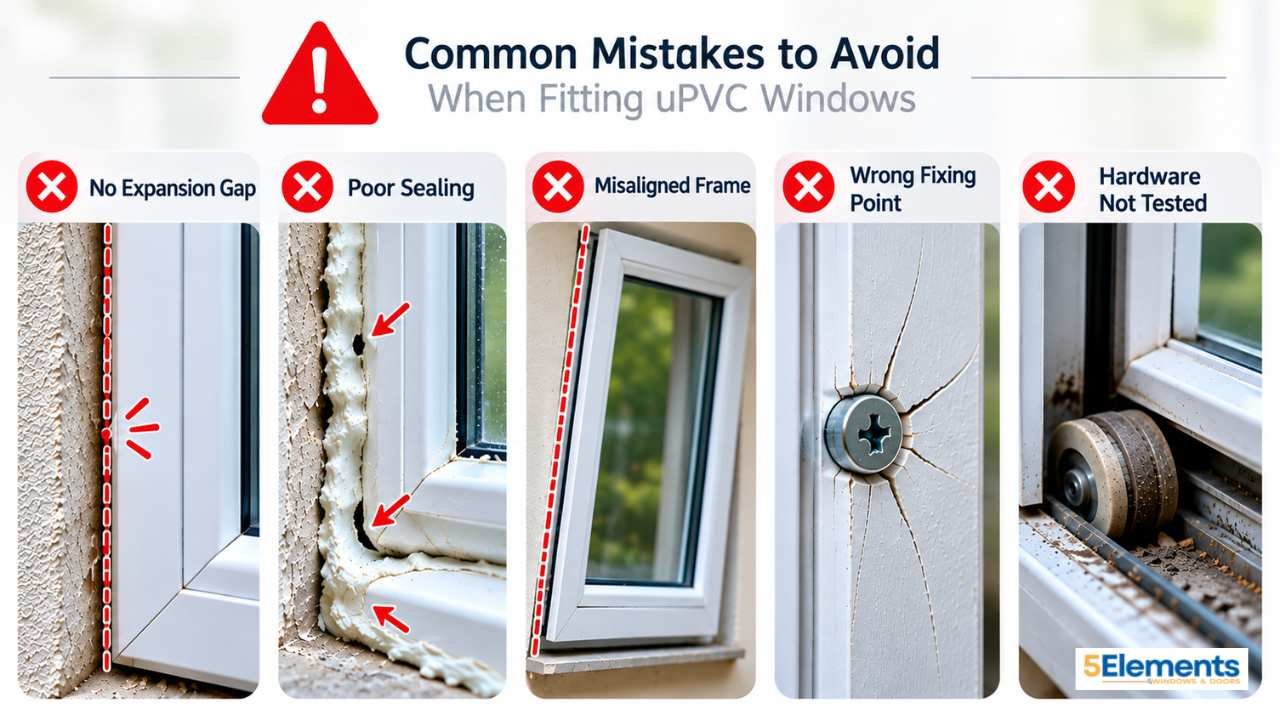
Even the most experienced workers can fall if they’re hurrying in fitting uPVC windows. These are the mistakes that cause the most long-term problems:
1. Skipping the expansion gap
uPVC frames stretch slightly as they heat. A frame that is too tightly pressed to the door, leaving no room for movement could bow or break as time passes.
2. Poor or uneven sealing
A silicone bead that has gaps, small patches or air bubbles, fails after one or two seasons particularly through the Kerala monsoon.
3. Rushing alignment checks
Skipping the plumb, level, and square checks to save time is the single biggest cause of sashes that bind, gaps that let in water, and sliding windows that stick.
4. Using the wrong fixing points
Drilling wherever is convenient instead of at the manufacturer’s marked points weakens the frame’s structural support.
5. Not testing hardware before finishing
Locks, hinges, and rollers should be tested and adjusted before the crew leaves, not after you notice a problem days later.
Almost every complaint we hear about fitting uPVC windows traces back to one of these five issues — which is exactly why the checks and process outlined earlier in this guide matter so much.
DIY vs Professional uPVC Window Installation in Kerala
DIY is achievable for smaller, ground-floor windows with a single panel in good shape, especially when you have the simple tools, and you are confident in adhering to the directions carefully. It’s a good option to cut costs on the cost of labor for a simple project that’s low-risk and easy to do.
Where DIY becomes risky is with larger windows, upper floors, sliding styles, or any opening where the wall shows cracks or damp — situations where a small mistake in fitting uPVC windows can lead to structural issues or water damage that costs far more to fix than the installation would have. These are also the jobs where plumb, level, and square checks matter most, and where getting them wrong is hardest to notice until it’s too late.
A professional installer checks things most DIYers don’t think to check: wall condition before fitting, correct packer placement, manufacturer-specified fixing points, and a final hardware test before leaving the site. If your project falls into any of the higher-risk categories above, it’s worth getting a proper site visit and quote from a team experienced in fitting uPVC windows across Kerala’s varied building conditions, like ours at 5 Elements. Find out when to find a window installer.
Conclusion
Correct fitting is what protects a uPVC window’s energy efficiency, weatherproofing, and lifespan — no matter how good the product itself is. In this article we’ve gone over the three-step fitting procedure, the reasons why plumb, level and square checks are important along with the tools and equipment required, what work is actually involved, what’s unique regarding sliding window installation and what factors affect the cost of installation in Kerala as well as the most frequently made errors to avoid, and the situations where DIY can be beneficial over employing professionals.
If your project is small, low-risk, and on the ground floor, DIY can work well. For anything larger, higher up, or on a wall that isn’t in perfect condition, a professional team pays for itself by avoiding costly repairs down the line. Our crews at 5Elements have handled fitting uPVC windows across all kinds of homes and building conditions throughout Kerala, and we’re happy to walk you through a site-specific quote whenever you’re ready to get started.
FAQ
1: How do you join two uPVC windows together?
Two uPVC windows are joined using a mullion connector that links the frames securely. The joint is then sealed with silicone to keep it fully weatherproof.
2: What is the correct way to install a window?
Prepare the opening, level and square the frame using packers, fix it at the correct points, then glaze and seal it. Every step should be checked before moving to the next.
3: How do you install windows step by step?
Measure and clear the opening, position and fix the frame after checking plumb, level, and square, then fit the glass, clip in the beads, and seal the edges.
4: What does uPVC window installation cost in Kerala?
Cost depends on window size, style, glazing type, and site condition. It’s best to get a site-specific quote rather than relying on generic online estimates.
5: How long does fitting uPVC windows usually take?
A single standard window typically takes one to two hours. Larger windows, sliding styles, or openings needing repair can take longer.